
| POD parameters : | user0 | POD0 | 10.1.64.110 |
| User | admin | node1 | node2 | node3 | spare |
|
user0
|
pod0-admin
eth0 : 10.1.64.110
eth1 : 10.1.65.110
eth2 : ext-net
Netmask : 255.255.255.0
Gateway : 10.1.64.1
|
pod0-node1
eth0 : 10.1.64.110
eth1 : 10.1.65.110
eth2 : ext-net
Netmask : 255.255.255.0
Gateway : 10.1.64.1
|
pod0-node2
eth0 : 10.1.64.110
eth1 : 10.1.65.110
eth2 : ext-net
Netmask : 255.255.255.0
Gateway : 10.1.64.1
|
pod0-node3
eth0 : 10.1.64.110
eth1 : 10.1.65.110
eth2 : ext-net
Netmask : 255.255.255.0
Gateway : 10.1.64.1
|
pod0-spare
eth0 : 10.1.64.110
eth1 : 10.1.65.110
eth2 : ext-net
Netmask : 255.255.255.0
Gateway : 10.1.64.1
|
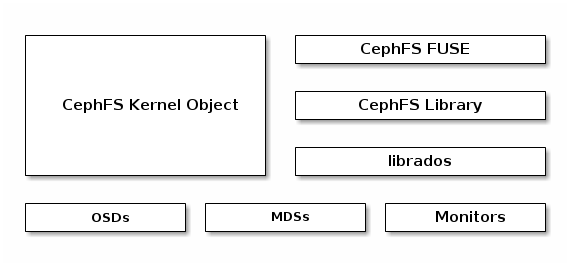
The Ceph Filesystem (Ceph FS) is a POSIX-compliant filesystem that uses a Ceph Storage Cluster to store its data. The Ceph filesystem uses the same Ceph Storage Cluster system as Ceph Block Devices, Ceph Object Storage with its S3 and Swift APIs, or native bindings (librados).
1. Requirement of CephFS
- A working Ceph Storage Cluster
- At least two pools; one for data and one for metadata
- At least one MDS node. MDS is required for CephFS to work.
2. Configure and map MDS servers.
1. Login into pod0-admin node and execute the below commands:
ssh centos@pod0-adminsudo su -2. Check for the cluster status
ceph -s3. Use ceph-deploy from pod0-mon1 node to deploy & configure MDS on pod0-osd1
cd ~/clusterceph-deploy mds create pod0-node1Output:
[compute244][WARNIN]Created symlink from /etc/systemd/system/ceph.target.wants/ceph-mds@pod0-node1.service to /usr/lib/systemd/system/[email protected].
[pod0-node1] [INFO] Running command: systemctl start ceph-mds@pod0-node1
[pod0-node1] [INFO] Running command: systemctl enable ceph.Target
4. Check for auth list:
ceph auth list6. Check for the cluster status:
ceph -s7. Check for mds status:
ceph mds statOutput:
e1: 0/0/0 up3. Describe the method to create and access file storage data
a. Create a Ceph Filesystem
A Ceph filesystem requires at least two RADOS pools, one for data and one for metadata.
On pod0-mon1 node:
1. Create data and metadata pools for the file system :
ceph osd pool create cephfs_data 64Output:
pool 'cephfs_data' createdceph osd pool create cephfs_metadata 64Output:
pool 'cephfs_metadata' created2. Finally, create the Ceph Filesystem; once this command is executed the MDS should attain an active state and CephFS should be ready for use
Syntax:
ceph fs new ceph fs new cephfs cephfs_metadata cephfs_dataOutput:
new fs with metadata pool 3 and data pool 2 3. List the ceph file system pools created:
ceph fs ls Output:
name: cephfs, metadata pool: cephfs_metadata, data pools: [cephfs_data]4. To verify the status of CephFS and MDS:
ceph mds statOutput:
e5: 1/1/1 up {0=compute244=up:active}5. It’s recommended that you don’t share client.admin user keyrings with Ceph clients, so we will create a user client.cephfs on the Ceph cluster and will allow this user access to CephFS pools
ceph auth get-or-create client.cephfs mon 'allow rw' mds 'allow rw' osd 'allow rwx pool=cephfs_metadata, allow rwx pool=cephfs_data' -o /etc/ceph/client.cephfs.keyringceph-authtool -p -n client.cephfs /etc/ceph/client.cephfs.keyring > /etc/ceph/client.cephfs1cat /etc/ceph/client.cephfs1
Output:
o/p: AQDE9PVXDC2vKRAAZxHuUc/So+ZnhfU7Kzm6+A==b. Accessing CephFS via kernel driver /Mount CephFS with the Kernel Driver
To mount the Ceph file system you may use the mount command.
1. Create a mount point directory:
mkdir /mnt/cephfs2. Get the keys for the client.cephfs user, which we created in the last section. Execute the following command from the Ceph monitor node to get the user keys
ceph auth get-key client.cephfsAQDE9PVXDC2vKRAAZxHuUc/So+ZnhfU7Kzm6+A==3. Mount CephFS using the native linux mount call with the following syntax
Syntax:
mount -t ceph <Monitor_IP>:<Monitor_port>: / <mount_point_name> -o name-admin,secret=<admin_user_key>mount -t ceph 10.1.64.110:6789:/ /mnt/cephfs -o name=cephfs,secret=`ceph auth get-key client.cephfs`4. Verify mounting:
df -hOutput:
Filesystem          Size  Used Avail Use% Mounted on
/dev/vda1            20G  1.7G   19G   9% /
devtmpfs            2.0G     0  2.0G   0% /dev
tmpfs               2.0G     0  2.0G   0% /dev/shm
tmpfs               2.0G   25M  2.0G   2% /run
tmpfs               2.0G     0  2.0G   0% /sys/fs/cgroup
tmpfs               396M     0  396M   0% /run/user/1000
10.1.64.117:6789:/   15G  104M   15G   1% /mnt/cephfs
5. To mount CephFS more securely, avoiding the admin key being visible in the command history, store the admin keyring as plain text in a separate file and use this file as a mount option for secret key
a. First, unmount the filesytsem:
umount /mnt/cephfs/b. Save the Key to a file:
ceph auth get-key client.cephfs > /etc/ceph/cephfskeymount -t ceph 10.1.64.110:6789:/ /mnt/cephfs -o name=cephfs,secretfile=/etc/ceph/cephfskey df -h /mnt/cephfs/Output:
 Filesystem          Size  Used Avail Use% Mounted on
10.1.64.110:6789:/   15G  108M   15G   1% /mnt/cephfs
6. To allow the CephFS mount during the OS startup, add the following lines in the /etc/fstab file
Syntax:
<Mon_ipaddress>:<monitor_port>:/<mount_point> <filesystem-name> [name=username, secret=secretkey|secretfile-=/path/to/secretfile], [{mount.options}]echo "10.1.64.110:6789:/ /mnt/cephfs ceph name=cephfs,secretfile=/etc/ceph/cephfskey,noatime 0 2" >> /etc/fstab7. Umount and mount CephFS again:
umount /mnt/cephfs/mount -adf -h /mnt/cephfs/Output:
Filesystem          Size  Used Avail Use% Mounted on
10.1.64.110:6789:/   15G  104M   15G   1% /mnt/cephfs
8. Perform some IO operation on the Ceph Filesystem and then unmount it:
dd if=/dev/zero of=/mnt/cephfs/file1 bs=1M count=1024Output:
1024+0 records in
1024+0 records out
1073741824 bytes (1.1 GB) copied, 0.534147 s, 2.0 GB/s
ls -l /mnt/cephfs/file1Output:
-rw-r--r-- 1 root root 1073741824 Oct 6 11:20 /mnt/cephfs/file1