
| POD parameters : | OpenStack Group-1 | user0 | aio110 | 10.1.64.110 | compute120 | 10.1.64.120 | [email protected] |
| User | aioX | computeY & cephZ | Network & Allocation Pool |
|
user0
ssh : [email protected]
vnc : lab.onecloudinc.com:5900
|
aio110
eth0 : 10.1.64.110
eth1 : 10.1.65.110
eth2 : ext-net
Netmask : 255.255.255.0
Gateway : 10.1.64.1
|
compute120
eth0 : 10.1.64.120
eth1 : 10.1.65.120
eth2 : ext-net
Netmask : 255.255.255.0
cephZ
eth0 : 10.1.64.Z
eth1 : 10.1.65.Z
|
Float Range : 10.1.65.00 – 10.1.65.00
Network : 10.1.65.0/24
Gateway : 10.1.65.1
DNS : 10.1.1.92
|
1. Lab Topology
Configure OpenStack to use LDAP for Identity Management
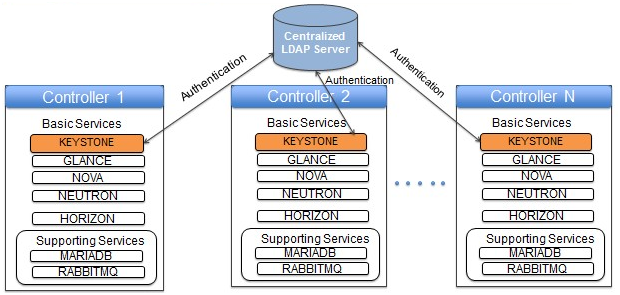
This Lab exercise gives information about OpenStack deployment using PackStack and understanding of OpenStack Identity service(Keystone) core concepts, including users, roles, tenants, and tokens, and working knowledge of keystone integration with Centralized LDAP and Active Directory.
2. Introduction
Lightweight Directory Access Protocol (LDAP) is a client/server protocol for accessing and managing directory information. OpenLDAP Software is a free, open source implementation of the Lightweight Directory Access Protocol (LDAP) developed by the OpenLDAP Project.
Lightweight Directory Access Protocol (LDAP) is a solution to access centrally stored information over network. This centrally stored information is organized in a directory that follows X.500 standard. The advantage of this approach is that the information can be grouped into containers and clients can access these containers whenever needed.
This Lab describes how to configure Keystone to use a Centralized Lightweight Directory Access Protocol (LDAP) server as its back end for identity services, instead of the default SQL back end.
Learn how to:
- Install an LDAP server by using PackStack, a tool for building OpenStack development environments.
- Configure Keystone to use the installed LDAP server through Keystone’s LDAP identity driver.
- Validate keystone against LDAP/AD through CLI and Dashboard.
2.1 LDAP Config Files
- config.ldif – The LDAP default configuration is stored under a file in /etc/openldap/slapd.d/cn=config.ldif that is created in the LDIF format. This is the LDAP Input Format (LDIF), a specific format that allows you to enter information in to the LDAP directory.
- olcDatabase{2}bdb.ldif – You can also modify the settings like number of connections the server can support, timeouts and other database settings under the file /etc/openldap/slapd.d/cn=config/olcDatabase{2}bdb.ldif. This is the file that also contains the parameters like LDAP root user and the base DN.
- The slaptest -u command to verify the configuration files.
3. Setting up an LDAP Server with PackStack
Set LDAP as the Keystone back end through the standard OpenStack through PackStack. Packstack is a utility that uses puppet modules to install OpenStack. It can be used to install each OpenStack service on separate servers, an ”all-in-one” (AIO) server, or any combination of these over SSH automatically.
On the Controller Node
Authentication plugins to support a number of different authentication methods. Run the following commands to install the packages. Install LDAP Server by running the following command:
yum install openldap* ldap* nss* db* -y- openldap (open source implementation of LDAP protocol) software suite consists of, openldap-server (Directory Server) openldap-clients (Provides tools to communicate with server like ldapsearch, ldapadd, etc.)
- nss (name service switch) applications use the NSS service to authenticate by using LDAP
- Slapd is the stand-alone LDAP daemon. It listens for LDAP connections on any number of ports (default 389), responding to the LDAP operations it receives over these connections.
source ~/keystonerc_adminopenstack user listopenstack project listopenstack role listopenstack service listopenstack endpoint listLDAP Configuration Steps:
1. We need to configure our basedn and add a password:
cd /etc/openldap/slapd.d/cn=config/2. We no longer edit slapd.conf to configure OpenLDAP. Use the ls command to look for a file called olcDatabase={2}hdb.ldif or olcDatabase={2}bdb.ldif or something like that in /etc/openldap/slapd.d/cn\=config/ path.
ls3.1 Create olcRootPW Root Password:
1. Now use slappasswd utility command to create a cleartext for the root password you want to use. Here we are creating cleartext/plaintext password. Execute the following command and specify a password in olcDatabase={2}hdb.ldif.
slappasswd -h {CLEARTEXT}Type the password as onecloud to have consistency during the lab.
Example output:
New password:onecloud
Re-enter new password:onecloud
onecloud
2. Once the cleartext password is generated, open the olcDatabase\=\{2\}hdb.ldif file, include the olcRootPW parameter.
a. Change the olcRootDN, for dc you might want to use by running the below command,
sed -i -e '/olcRootDN/ s/cn=Manager,dc=my-domain,dc=com/cn=Manager,dc=openstack,dc=org/' olcDatabase={2}hdb.ldifb. Make sure olcSuffix is updated according to openstack dc.
sed -i -e '/olcSuffix/ s/dc=my-domain,dc=com/dc=openstack,dc=org/' olcDatabase={2}hdb.ldifc. Now we need to add the password “onecloud”, you may have to add the olcRootPW line at end of the file by running the below command,
sed -i -e '$ a olcRootPW: onecloud' olcDatabase={2}hdb.ldif3. Specifying your dc, you might want to use in olcAccess parameter under: olcDatabase\=\{1\}monitor.ldif Modify dc that you want to use running the below command,
sed -i -e 's/cn=Manager,dc=my-domain,dc=com/cn=Manager,dc=openstack,dc=org/' olcDatabase\=\{1\}monitor.ldif4. Enable and Start slapd service using the following command:
systemctl enable slapd
systemctl start slapd
5. The command to verify the configuration file as shown below. This should display “testing succeeded” message as shown below.
slaptest -uExample output:
config file testing succeeded.
cd3.2 Create openstack.ldif file
Create openstack.ldif file and update the OpenStack schema. Here we need to properly mention cn=user_id, which is collected and stored earlier from SQL backend driver. (From Section 3) And we have to change the password of each service, so need to grab all the admin_password from rest of the services and map into userPassword parameter in openstack.ldif file. Here we will use the default password as onecloud which was set during packstack installation.
Run the below command to create openstack.ldif file:
cat << EOF >> ~/openstack.ldif
# extended LDIF
#
# LDAPv3
# base <dc=openstack,dc=org> with scope subtree
# filter: (objectclass=*)
# requesting: ALL
#
# openstack.org
dn: dc=openstack,dc=org
objectClass: dcObject
objectClass: organizationalUnit
dc: openstack
ou: openstack

# UserGroups, openstack.org
dn: ou=UserGroups,dc=openstack,dc=org
objectClass: organizationalUnit
ou: UserGroups

# Users, openstack.org
dn: ou=Users,dc=openstack,dc=org
objectClass: organizationalUnit
ou: Users

# Roles, openstack.org
dn: ou=Roles,dc=openstack,dc=org
ou: roles
objectClass: organizationalUnit

# Tenants, openstack.org
dn: ou=Tenants,dc=openstack,dc=org
ou: tenants
objectClass: organizationalUnit

# admin, Users, openstack.org
dn: cn=ADMIN_ID,ou=Users,dc=openstack,dc=org
objectClass: person
objectClass: inetOrgPerson
sn: admin
cn: ADMIN_ID
userPassword: onecloud

# _member_, Roles, openstack.org
dn: cn=MEMBER_ROLE_ID,ou=Roles,dc=openstack,dc=org
objectClass: organizationalRole
ou: _member_
cn: MEMBER_ROLE_ID

# nova, Users, openstack.org
dn: cn=NOVA_USER_ID,ou=Users,dc=openstack,dc=org
objectClass: person
objectClass: inetOrgPerson
sn: nova
cn: NOVA_USER_ID
userPassword: onecloud

# cinder, Users, openstack.org
dn: cn=CINDER_USER_ID,ou=Users,dc=openstack,dc=org
objectClass: person
objectClass: inetOrgPerson
sn: cinder
cn: CINDER_USER_ID
userPassword: onecloud

# glance, Users, openstack.org
dn: cn=GLANCE_USER_ID,ou=Users,dc=openstack,dc=org
objectClass: person
objectClass: inetOrgPerson
sn: glance
cn: GLANCE_USER_ID
userPassword: onecloud

# heat, Users, openstack.org
dn: cn=HEAT_USER_ID,ou=Users,dc=openstack,dc=org
objectClass: person
objectClass: inetOrgPerson
sn: heat
cn: HEAT_USER_ID
userPassword: onecloud

# neutron, Users, openstack.org
dn: cn=NEUTRON_USER_ID,ou=Users,dc=openstack,dc=org
objectClass: person
objectClass: inetOrgPerson
sn: neutron
cn: NEUTRON_USER_ID
userPassword: onecloud
EOFWe need to replace the value of IDs (ADMIN_ID, MEMBER_ROLE_ID, NOVA_USER_ID, CINDER_USER_ID, GLANCE_USER_ID, HEAT_USER_ID, NEUTRON_USER_ID) in the openstack.ldif file created above.
Run the below command to create a script used to populate the openstack.ldif file with the ID values,
cat << EOF >> ~/get_ID_to_ldif.sh
#!/bin/bash
# fetch user ID and update openstack.ldif file
sed -i -e "s/ADMIN_ID/`openstack user list | awk '/admin/{print $2}'`/g" ~/openstack.ldif
sed -i -e "s/MEMBER_ROLE_ID/`openstack role list | awk '/member/{print $2}'`/g" ~/openstack.ldif
sed -i -e "s/NOVA_USER_ID/`openstack user list | awk '/nova/{print $2}'`/g" ~/openstack.ldif
sed -i -e "s/CINDER_USER_ID/`openstack user list | awk '/cinder/{print $2}'`/g" ~/openstack.ldif
sed -i -e "s/GLANCE_USER_ID/`openstack user list | awk '/glance/{print $2}'`/g" ~/openstack.ldif
sed -i -e "s/HEAT_USER_ID/`openstack user list | awk '/heat/{print $2}'`/g" ~/openstack.ldif
sed -i -e "s/NEUTRON_USER_ID/`openstack user list | awk '/neutron/{print $2}'`/g" ~/openstack.ldif
EOF
Make the script executable and the run the script using commands below to populate the openstack.ldif file with proper ID,
chmod +x get_ID_to_ldif.shExecute the script using below command,
./get_ID_to_ldif.sh4. Configure keystone to use its LDAP back-end identity driver
a. With Keystone, you can create a “users” domain with an LDAP identity backend for the enterprise user accounts. To do that, check in the keystone.conf file.
openstack-config --set /etc/keystone/keystone.conf DEFAULT admin_token ADMIN_TOKENThe static token (admin_token) is a parameter that will allow us to talk to the keystone service in advance of keystone knowing about any particular user or backend for user authentication.
b. Make changes to [identity] section in the same configuration file for changing the driver from sql to ldap
openstack-config --set /etc/keystone/keystone.conf identity driver keystone.identity.backends.ldap.Identityc. Add entry to [assignment] section in the same configuration file to include driver for sql.
openstack-config --set /etc/keystone/keystone.conf assignment driver keystone.assignment.backends.sql.Assignmentd. Define the destination LDAP server and Create the Organizational Units in the LDAP directory, and define their corresponding location in keystone.conf to ldap section :
cat <<EOF>> /etc/keystone/keystone.conf

[ldap]

url = ldap://localhost

user = cn=Manager,dc=openstack,dc=org

password = onecloud

suffix = cn=openstack,cn=org

use_dumb_member = True

user_attribute_ignore = enabled,email,tenants,default_project_id

tree_dn = dc=openstack,dc=org

user_tree_dn = ou=Users,dc=openstack,dc=org

user_objectclass = inetOrgPerson

user_id_attribute = cn

user_name_attribute = sn

user_pass_attribute = userPassword

user_allow_create = True

user_allow_update = True

user_enabled_attribute = enabled

user_enabled_default = True

user_enabled_emulation = True

user_domain_id_attribute = None

tenant_tree_dn = ou=Projects,dc=openstack,dc=org

tenant_objectclass = groupOfNames

tenant_id_attribute = cn

tenant_member_attribute = member

tenant_name_attribute = ou

tenant_domain_id_attribute = None

tenant_allow_create = True

tenant_allow_update = True

role_tree_dn = ou=Roles,dc=openstack,dc=org

role_objectclass = groupOfNames

role_member_attribute = member

role_id_attribute = cn

role_name_attribute = ou

role_allow_create = True

role_allow_update = True

EOFWhen you have finished the configuration, Keystone was configured to use its LDAP back-end identity driver. Then restart the OpenStack Identity service.
systemctl restart httpd.service4.1 Verify the LDAP Search
To verify if the LDAP server is configured successfully, you can use the below command.
ldapsearch -x -b 'dc=openstack,dc=org' '(objectclass=*)'This will return empty result from LDAP/AD like “result: no such object (32)”
By default Keystone uses sql as backend for database, and sql entries contained each service (glance, nova, cinder, neutron, swift, heat, ceilometer etc) as a user which had their passwords stored in sql database. Now we also have to add entries for each of those services (glance, nova, cinder, neutron, swift, heat, ceilometer etc) in our ldap (as described in the openstack.ldif file created in section 3.2)
The use of OU (organizational unit) objects can help you in providing additional structure to the LDAP database. If you are planning on adding in different types of entries, such as users, groups, computers, printers and more to the LDAP directory, it makes it easier to put every entry type into its own container.
The following are the two most commonly used objects in OpenLDAP:
- cn (common name) – This refers to the leaf entries, which are end objects (for example: users and groups)
- dc (domain component) – This refers to one of the container entries in the LDAP hierarchy. In a setup, if LDAP hierarchy is mapped to a DNS hierarchy, typically all DNS domains are referred to as DC objects.
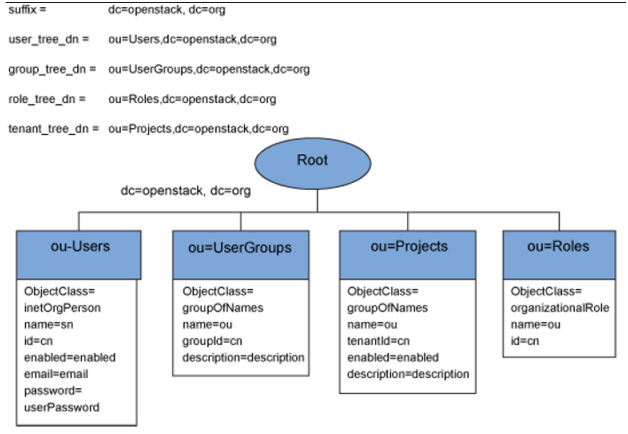
In the above example LDAP tree, Users, UserGroups, Projects, and Roles each is its own subtree that uses a standard LDAP ObjectClass. In the Users subtree, for example, ObjectClass=inetOrgPerson.
4.2 Import schemas
ldapadd -Y EXTERNAL -H ldapi:/// -f/etc/openldap/schema/cosine.ldif
ldapadd -Y EXTERNAL -H ldapi:/// -f/etc/openldap/schema/inetorgperson.ldif
ldapadd -Y EXTERNAL -H ldapi:/// -f/etc/openldap/schema/nis.ldif
4.3 Import Base Structure:
a. Now we can import the base structure in to the LDAP directory using the ldapadd command as shown below.
ldapadd -x -D "cn=Manager, dc=openstack, dc=org" -W <~/openstack.ldifExample output looks like as below:
Enter LDAP Password: onecloud
adding new entry "dc=openstack,dc=org"
adding new entry "ou=UserGroups,dc=openstack,dc=org"
adding new entry "ou=Users,dc=openstack,dc=org"
adding new entry "ou=Roles,dc=openstack,dc=org"
adding new entry "ou=Tenants,dc=openstack,dc=org"
adding new entry "cn=c87f5bf84abe4bca8daa6e8283d179c6,ou=Users,dc=openstack,dc=org"
adding new entry "cn=9fe2ff9ee4384b1894a90878d3e92bab,ou=Roles,dc=openstack,dc=org"
adding new entry "cn=4011e55571e14498b304d709b3d2f72a,ou=Users,dc=openstack,dc=org"
adding new entry "cn=1906f67d3fb74997aaac3c88ea86a5cb,ou=Users,dc=openstack,dc=org"
adding new entry "cn=8648129611604feead716fc7eafdd3ec,ou=Users,dc=openstack,dc=org"
adding new entry "cn=4fe832edba8b42f6a41b1bbe8a5c002b,ou=Users,dc=openstack,dc=org"
adding new entry "cn=8d8b3c5ecf3148cf928049560454299c,ou=Users,dc=openstack,dc=org"
b. Now edit /etc/keystone/keystone.conf and make sure public_endpoint and admin_endpoint are uncommented to communicate with ldap.
Adding public_endpoint:
openstack-config --set /etc/keystone/keystone.conf DEFAULT public_endpoint http://aio110:5000/Adding admin_endpoint:
openstack-config --set /etc/keystone/keystone.conf DEFAULT admin_endpoint http://aio110:35357/c. Restart keystone service
systemctl restart httpd.service4.4 Verify the LDAP Search
To verify the ldap server is configured successfully, you can use the below command and verify that the domain entry is present.
ldapsearch -x -b 'dc=openstack,dc=org' '(objectclass=*)'Example Output:
# extended LDIF
#
# LDAPv3
# base  with scope subtree
# filter: (objectclass=*)
# requesting: ALL
#

# openstack.org
dn: dc=openstack,dc=org
objectClass: dcObject
objectClass: organizationalUnit
dc: openstack
ou: openstack

# UserGroups, openstack.org
dn: ou=UserGroups,dc=openstack,dc=org
objectClass: organizationalUnit
ou: UserGroups

# Users, openstack.org
dn: ou=Users,dc=openstack,dc=org
objectClass: organizationalUnit
ou: Users

# Roles, openstack.org
dn: ou=Roles,dc=openstack,dc=org
ou: roles
objectClass: organizationalUnit

# Tenants, openstack.org
dn: ou=Tenants,dc=openstack,dc=org
ou: tenants
objectClass: organizationalUnit

# 0498f93d709d43ab9518e2e78cc1ad45, Users, openstack.org
dn: cn=0498f93d709d43ab9518e2e78cc1ad45,ou=Users,dc=openstack,dc=org
objectClass: person
objectClass: inetOrgPerson
sn: admin
cn: 0498f93d709d43ab9518e2e78cc1ad45
userPassword:: b25lY2xvdWQ=

# 9fe2ff9ee4384b1894a90878d3e92bab, Roles, openstack.org
dn: cn=9fe2ff9ee4384b1894a90878d3e92bab,ou=Roles,dc=openstack,dc=org
objectClass: organizationalRole
ou: _member_
cn: 9fe2ff9ee4384b1894a90878d3e92bab

# 51b7df9a114c4c5187e46cd6d686e590, Users, openstack.org
dn: cn=51b7df9a114c4c5187e46cd6d686e590,ou=Users,dc=openstack,dc=org
objectClass: person
objectClass: inetOrgPerson
sn: nova
cn: 51b7df9a114c4c5187e46cd6d686e590
userPassword:: b25lY2xvdWQ=

# eda813f4eb96471c9554bdbc2cab2f57, Users, openstack.org
dn: cn=eda813f4eb96471c9554bdbc2cab2f57,ou=Users,dc=openstack,dc=org
objectClass: person
objectClass: inetOrgPerson
sn: cinder
cn: eda813f4eb96471c9554bdbc2cab2f57
userPassword:: b25lY2xvdWQ=

# 769623c489834afcaf05af5154d4aea9, Users, openstack.org
dn: cn=769623c489834afcaf05af5154d4aea9,ou=Users,dc=openstack,dc=org
objectClass: person
objectClass: inetOrgPerson
sn: glance
cn: 769623c489834afcaf05af5154d4aea9
userPassword:: b25lY2xvdWQ=

# afe2f0b7f5074b9ebb688cb60d727563, Users, openstack.org
dn: cn=afe2f0b7f5074b9ebb688cb60d727563,ou=Users,dc=openstack,dc=org
objectClass: person
objectClass: inetOrgPerson
sn: heat
cn: afe2f0b7f5074b9ebb688cb60d727563
userPassword:: b25lY2xvdWQ=

# 80381782e87a4a5b88847f793d926853, Users, openstack.org
dn: cn=80381782e87a4a5b88847f793d926853,ou=Users,dc=openstack,dc=org
objectClass: person
objectClass: inetOrgPerson
sn: neutron
cn: 80381782e87a4a5b88847f793d926853
userPassword:: b25lY2xvdWQ=

# search result
search: 2
result: 0 Success

# numResponses: 13
# numEntries: 12
4.5 Validating keystone integration against LDAP/AD
source ~/keystonerc_admin4.5.1 Validating Keystone User-List
If the LDAP mappings are correct in keystone.conf, the “user list” command should show the list of users in the LDAP database.
openstack user listExample Output:
+----------------------------------+---------+
| ID                               | Name    |
+----------------------------------+---------+
| c87f5bf84abe4bca8daa6e8283d179c6 | admin   |
| 4011e55571e14498b304d709b3d2f72a | nova    |
| 1906f67d3fb74997aaac3c88ea86a5cb | cinder  |
| 8648129611604feead716fc7eafdd3ec | glance  |
| 4fe832edba8b42f6a41b1bbe8a5c002b | heat    |
| 8d8b3c5ecf3148cf928049560454299c | neutron |
+----------------------------------+---------+
4.5.2 Validating Keystone Project List
openstack project listExample Output:
+----------------------------------+----------+
| ID                               | Name     |
+----------------------------------+----------+
| 066f151218734895abf8739617985851 | admin    |
| 56d2abb24b4f456d92e8e1f6f45f2189 | services |
+----------------------------------+----------+
4.5.3 Validating Keystone Role List
openstack role listExample Output:
+----------------------------------+------------------+
| ID                               | Name             |
+----------------------------------+------------------+
| 10b4fc936b3e46d6953d8b48142ed472 | heat_stack_owner |
| 42991068db8f4e17b57db79e8e5d7eba | heat_stack_user  |
| 7f4c8625af164dcbb3d5296e0fce2eb2 | admin            |
| 9fe2ff9ee4384b1894a90878d3e92bab | _member_         |
+----------------------------------+------------------+
5. Creating Users, Tenants, Roles on LDAP Server through CLI
5.1 Creating Openstack User through CLI
1. Execute the following command:
openstack user create onecloud-user-1 --password user-1 --email [email protected]Example output:
+----------+----------------------------------+
| Field    | Value                            |
+----------+----------------------------------+
| email    | [email protected]                  |
| id       | eb62d9fc0980477a87611fea51e8c56e |
| name     | onecloud-user-1                  |
| username | onecloud-user-1                  |
+----------+----------------------------------+
2. Verify the user
openstack user listExample output:
+----------------------------------+-----------------+
| ID                               | Name            |
+----------------------------------+-----------------+
| c87f5bf84abe4bca8daa6e8283d179c6 | admin           |
| 4011e55571e14498b304d709b3d2f72a | nova            |
| 1906f67d3fb74997aaac3c88ea86a5cb | cinder          |
| 8648129611604feead716fc7eafdd3ec | glance          |
| 4fe832edba8b42f6a41b1bbe8a5c002b | heat            |
| 8d8b3c5ecf3148cf928049560454299c | neutron         |
| eb62d9fc0980477a87611fea51e8c56e | onecloud-user-1 |
+----------------------------------+-----------------+
3. Create New Openstack Tenant.
openstack project create onecloud-labs --description "Tenant for onecloud labs"Example output:
+-------------+----------------------------------+
| Field       | Value                            |
+-------------+----------------------------------+
| description | Tenant for onecloud labs         |
| enabled     | True                             |
| id          | 36e9674f832144f2aa65fb7fc424709e |
| name        | onecloud-labs                    |
+-------------+----------------------------------+
4. Check the newly created OpenStack Tenant and User through CLI.
openstack project listExample output:
+----------------------------------+---------------+
| ID                               | Name          |
+----------------------------------+---------------+
| 066f151218734895abf8739617985851 | admin         |
| 36e9674f832144f2aa65fb7fc424709e | onecloud-labs |
| 56d2abb24b4f456d92e8e1f6f45f2189 | services      |
+----------------------------------+---------------+
5. Finally, grant the admin role to the OpenStack Administrator account in the onecloud-labs Tenant.
openstack role add --user onecloud-user-1 --project admin adminExample Output:
+-------+----------------------------------+
| Field | Value                            |
+-------+----------------------------------+
| id    | 7f4c8625af164dcbb3d5296e0fce2eb2 |
| name  | admin                            |
+-------+----------------------------------+
6. Now check the newly created OpenStack User in LDAP Server.
ldapsearch -x -b 'dc=openstack,dc=org' '(sn=onecloud-user-1)'Example Output:
# extended LDIF
#
# LDAPv3
# base  with scope subtree
# filter: (sn=onecloud-user-1)
# requesting: ALL
#

# bbfe62d6225c468ea5c32a576b77c5f6, Users, openstack.org
dn: cn=bbfe62d6225c468ea5c32a576b77c5f6,ou=Users,dc=openstack,dc=org
objectClass: person
objectClass: inetOrgPerson
userPassword:: dXNlci0x
cn: bbfe62d6225c468ea5c32a576b77c5f6
sn: onecloud-user-1

# search result
search: 2
result: 0 Success

# numResponses: 2
# numEntries: 1